 Today we will be making the first of our projects - a small storage container - practising the skills of:
Straight Stitching
Stitching around corners
Clipping corners
Turning through with pointed corners
Top StitchingTop stitching
I made one of these at my quilting group and thought it suited our needs here perfectly!!
(Apologies:- I tried to find someone to thank for the creative idea but didn't have any luck!)
So let's do it!!
From your fabrics, select 2. We are going to cut a rectangle from each - 7" x 5" - I selected a dark and a light from the lovely selection that Louise sent me - thanks Louise!!
If you have a rotary cutter and cutting mat, you will use your rule to measure and cut the rectangles.
Today we will be making the first of our projects - a small storage container - practising the skills of:
Straight Stitching
Stitching around corners
Clipping corners
Turning through with pointed corners
Top StitchingTop stitching
I made one of these at my quilting group and thought it suited our needs here perfectly!!
(Apologies:- I tried to find someone to thank for the creative idea but didn't have any luck!)
So let's do it!!
From your fabrics, select 2. We are going to cut a rectangle from each - 7" x 5" - I selected a dark and a light from the lovely selection that Louise sent me - thanks Louise!!
If you have a rotary cutter and cutting mat, you will use your rule to measure and cut the rectangles.
Gemma has given some great tips for using your rotary cutter here
If you don't have a rotary cutter, TOMG has a great starter pack available see here and don't forget that lay-by is available for all orders over $50.00 (great Xmas pressie!! )
Now don't worry if you don't have a rotary cutter as you can certainly manage without one - it just takes a little more time!
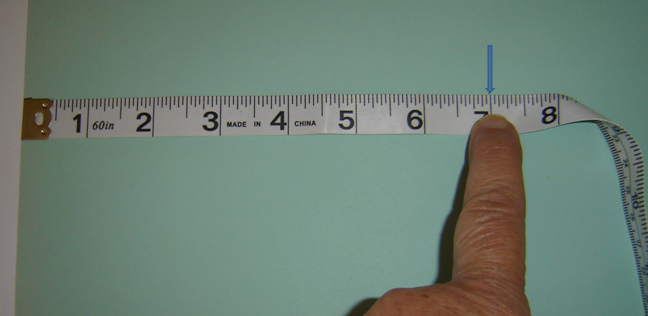
Take a sheet of paper and measure 7" along from one corner and mark.

Then measure from the corner along the other side 5" and mark.
Now move your tape up to the 5" mark and measure across 7" and mark - check that it measures 5" from that mark straight down to the 7" mark on the edge (mine was spot on!) If not just adjust.
I then folded to join the dots
and cut along the folds to get my 7" x 5" rectangle
I can now use my 'pattern' to cut a rectangle from each of the fabrics. (note that you cut the piece from an edge not the centre of your fat 1/4 )
Now it's time to sew. With right sides together and starting about 3" from a corner (don't forget to reverse), sew around the outside, taking care to turn sharply at the corners (remember to leave your needle down, lift the Pressure Foot and turn your fabric, lower the Pressure Foot) and stopping about 2.5" from where you started with a couple of reverse stitches.
Press and
Clip the corners
I am going to trim closer by curving slightly - take care not to cut the stitching. If you do, just go and restitch it in a little further.
Turn to the right side and gently ease the corners out. You can use any item as your tool - some use a chop stick - I have a wooden skewer that I have filed the sharp point off and a knitting needle!
Don't push too hard or you might push right through the corner!!
Roll between your thumb and fingers and press remembering to press the seams in where you left the opening.
Topstitch all the way around the edge about 1/8" from the edge - just find a spot on your foot and watch the fabric there - not the needle or use your Stitch in the Ditch foot (this will close the opening!)
Cut out a piece of paper 3.5""x1.5" and centre this on the mat - trace the rectangle and then stitch.
Decide which fabric you want on the outside - I am having the dark - and then fold from a corner so the adjoining sides are level.
You are now going to stitch from the corner of the sewn inner rectangle at a right-angle to the sides. Do this for each corner.
Press along the stitching of the rectangle to form the base.
Then we simply turn the corners out to form the trim.
Taa Daa!! You now have a sweet little container - I use mine to hold business cards!!
You can simply make this any size to suit your storage needs, noting that it will need some pellon if you go larger for support. I hope you enjoyed making it!!!
What do you think you will use it for?
We would love to see your photos!!
Until next time
Nanny :)


No comments:
Post a Comment