Today we are starting a little series on basic hand embroidery . I do not claim to be an expert embroiderer, but I do enjoy being able to add that element to my projects. You too will be able to use these skills as you embellish your sewing projects.
Many have been left with unpleasant memories of 'school sewing' and avoid hand stitching but Nanny will show you how easy it really is!
The first thing in our series will be to look at the equipment and then at some basic 'getting ready to embroider' tips.
1.Thread or embroidery floss:
How to purchase Embroidery Thread or Floss.
When I mention embroidery thread (sometimes called floss), I am referring to the 6 stranded thread that comes in a skein. It is held together by two paper labels.

The top label shows the number 25 - this tells you it is the six stranded thread
The bottom label also has a number and this is the colour number.
2. Needles
Embroidery needles are also called Crewel needles. They have a larger eye necessary to thread the strands of embroidery floss/thread.
How to store your embroidery floss/thread:
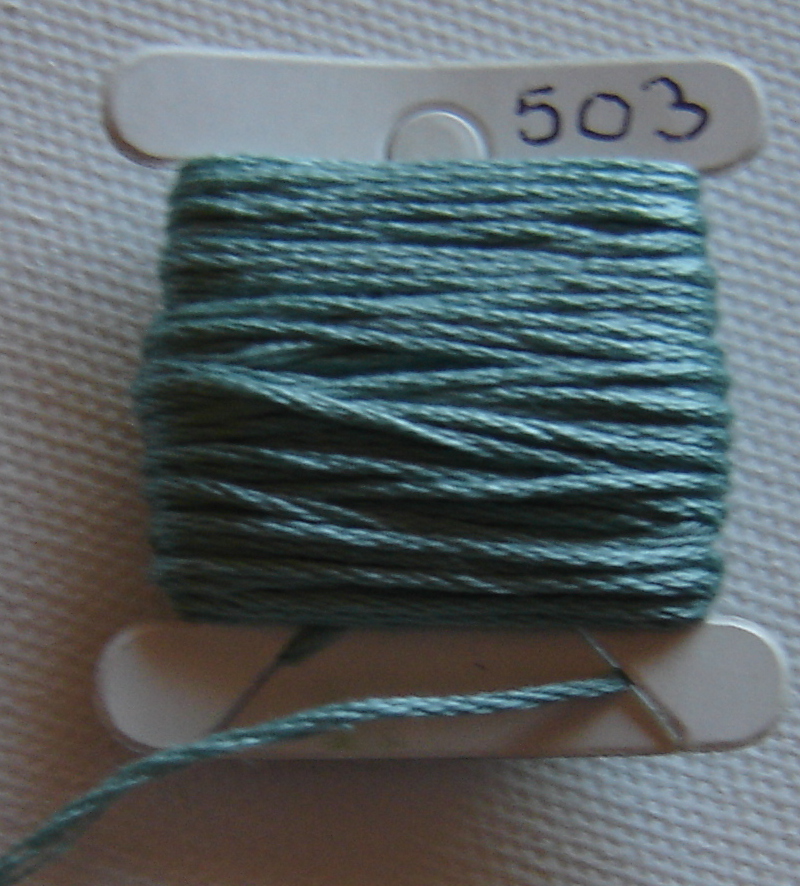
You can purchase these cardboard cards (or make your own)
Remove the paper wrappers from each end of the skein
Write the colour number on your card
Open the loop of thread, making sure that all loops are open. You will see down at the bottom that some of mine are still not opened yet
- I will fix these before I go on.
Tuck end of thread into slit in card
Wind thread onto card, spreading along the card and back
When finished, tuck end into other slit in card
Pop into your container (and watch your collection grow!)
How long to cut your threads for embroidery
Once again this will vary with personal preference, how large the section to be embroidered is etc. A good length is about 12" (30cm)- 15" (39cm). You will find this manageable and so less likely to end up in knots!
How to Separate the Strands of Embroidery Floss/Thread
When you embroider you may use a different number of strands of thread. The number will be determined by the effect you want it to have. I generally use 2 or 3 strands.
People have many interesting ways of separating the strands - all designed to avoid knotting! This is a simple technique for you - it works for me!
Take the end of the thread and separate the strands - you should see 6!
Hold the thread so it lies along in your hand,close your fingers around the thread and grip it firmly Pull the strands you selected and you will notice it start to bunch up at the bottom of your hand. That is OK!!
Keep pulling until your strands are free BUT don't let the thread in your hand go. You will end up with a big bunch.
Take the ends showing at the bottom of your hand and, while still holding your hand firm, pull the thread out straight again. Wasn't that simple!
Now find a design you like so we can start stitching!
Until next time
Nanny xx


No comments:
Post a Comment