Showing posts with label Sewing Tips. Show all posts

6 Great Ideas for Organising Your Craft Space

6 Great Ideas for Organising Your Craft Space - The Oz Material Girls

It's the start of a fantastic new year and I've decided to expand my horizons...from the comfort of my favourite (only?) couch. For those that haven't had the pleasure of e-meeting me, I'm Rachael from Sew Today, Clean Tomorrow and I've been invited over here to do a spot of blogging for The Oz Material Girls.

If you're anything like me then you always start the new year with a bright, shiny list of goals. Some are a little fanciful: "Play guitar with Dave Grohl", others are more realistic: "Learn to play guitar", but there is one that finds its way onto my list every year..."Organise my craft space".

I love the idea of the gorgeous craft spaces I've seen during my late night, wine-fuelled stalkings of Pinterest, but find many to be a little beyond the limits of my talent/time/bank account. Here is a list of my more practical and mostly budget-friendly solutions for organising my knick-knacks, gadgets and sewing doohickeys.

Tip 1 - Use a rubber band to store your bobbin and thread. Not only does it keep the threads in place, it's also a great way of making sure bobbin and spool remain together, forever, happily every after.
Use a rubber band to keep bobbin and spool together
Tip 2 - Store sewing machine accessories in compartment boxes (e.g. beading boxes). This is a great way to neatly store your sewing machine feet, machine needles and other accessories.  Label the box lid to make it even easier to find what you're looking for.

Use a beading box to store sewing machine feet
Use a compartment box to store sewing machine feet
Label the lid
Label the lid
It's a great way to store needles too
Tip 3 - Organise patterns in plastic pockets or large envelopes. This is a great way to keep all the bits and pieces of your project in one place. E.g. pattern pieces, instructions, zips, buttons, fabric, elastic etc.

Use envelopes or plastic pockets for patterns and projects
Tip 4 - Keep often used gadgets within easy reach with these practical, eye-catching embroidery hoops. This great project is quick, easy and affordable to make. You can find a tutorial here: Sew Today, Clean Tomorrow Embroidery Hoop Organiser Tutorial.


Tip 5 - Small knick-knacks can live in fabric bowls made from your favourite scraps. My hexie bowls are a lovely addition to the craft room and do a great job of housing my Clover Wonderclips, pattern weights, rubber bands and many more bits and pieces. The Hexie Bowl pattern is available through Patterns Only here: Hexie Bowl PDF Pattern.

Small knick-knacks love to call a fabric bowl home
Tip 6 - Nails/Hooks/Pegs can keep scissors and cutters within your easy reach (and out of reach of others). It's not the most beautiful solution out there but this shelf, with it's scissor storage underneath, was a breath of fresh air for my craft room. It frees up bench space, keeps everything close by and stops my all-too-regular "where did I just put those dang scissors?" dance.

Hooks/nails/pegs keep scissors within reach.
A shelf for easy storage
It may be small, but this shelf is a mighty addition to my craft room.
There you have it. A small peek into my craft room and a few of my more nifty storage solutions. What handy little hints and tips do you have for organising your craft space?

Photobucket

Read more >>

Hints & Tips

We have some fabulous tutorials and tips on our blog, so today we will be linking you to a few of them.... if it's upsizing a pattern, fussy cutting, adding a zip or, then read on and just click on the pictures to view the full tutorials

Is there something you are struggling with and would like us to do a tutorial on, just comment below and we will see what we can do!

How to upsize patterns


Zipper do do da - Part 1


Until next time

Photobucket

Read more >>

Pattern Review - Ava Pleated Skirt by Hadley Grace Designs


The Ava Pleated Skirt!

Melissa here again, from Ms Midge!  I have another new pattern in my hands to review for you!  I've set myself a bit of a challenge this year.  I would really like to make all of my girl's skirts and dresses!  I have lots of dress patterns, but only a few skirts, so went searching through the PDF's and found this beauty!  It's the Ava Pleated Skirt, by Hadley Grace Designs.  You can find it HERE at Patterns Only.


I bought some gorgeous bright light drill fabric on sale last week, so pulled it out for this project.  If you pop over to The Oz Material Girls you will surely find something that will jump out and grab you.  The beauty of this pattern is that you could use ANY weight fabric, so the options are endless.  It also means you can make skirts for all seasons.

I don't usually print out my PDF instructions, but given this pattern doesn't actually come with pattern pieces as such, I've printed it out so I have all of the measurements in black and white.   There are a couple of tables which have the measurements in inches for the size, waist, Measurements for the fabric in width & length, amount of fabric to purchase and the finished skirt length.  This I find REALLY handy.  Once I realised there were no pattern pieces, I was excited.  This meant all I have to work with is one or two lengths of fabric.


The other AMAZING thing about this pattern is that it gives you all of the measurements for sizes NEWBORN through to size 14!!  Fabulous!  So the next thing I had to do was work out what size I was going to be guided by.  I measured my eldest daughter's waist and decided to go by a size 9.

The next part of the instructions is "Elastic for the Waist".  I must say, it took me a couple of reads to understand them!  It's a little confusing, and would be much more effective for the measurements to actually be added to the tables I described above.  I did figure it out though!

The directions go on to instruct you how to start putting the skirt together.  Sizes 6 and under are made using one continuous length of fabric, giving it only one seam at the back.  Sizes 7 and up need a front and a back length, giving it two side seams.  There is no SEAM ALLOWANCE mentioned in the instructions.  I flicked through the rest of the instructions and found a half inch seam allowance mentioned near the end, so went with that!

Instructions then begin for how to assemble the pleats in the skirt.  I am feeling a little silly by this stage, because I am having to read this a few times again!  Eventually it clicks - The instructions really are aimed at making up to a size 6.  Because when you start making them 7+, it differs due to having two lengths of fabric instead of the one.  Again, I figure it out!

Here's a tip that I found out the "hard way".  Measure the half way mark on the front piece of your skirt and mark it BEFORE you sew the side seam together.  I did it the other way around and when I went to sew the other side seam up after adding the pleats, I realised it was not even, so ended up taking it in a bit to even it up.


How to assemble the pleats was really quite easy to follow (phew) and I had them all pinned beautifully.  The instructions suggest that the pleats should be 4" apart, and "for sizes 2 up to about a size 6, 5 pleats are probably perfect.  For the bigger sized skirts you will probably need to add 7 or 9 pleats."  This simply does not work.  I made a size 9 skirt.  And there was only enough room to fit 5 pleats!  So it does beg the question on how you would fit 5 pleats on a teeny size?  I'm guessing you would have to make the size of the pleats smaller as well as the spacing between them?


Not much room left for any more than 5 pleats.


Something new I learnt, and loved from this pattern was the double seam at the hem.  It looks fabulous!


Last, but not least, were the instructions on how to finish the waist.  This pattern has a flat front, which is gorgeous, and an elasticised back.  I altered the way I did this.  The instructions direct you to sew all around the waist, leaving only a 3" opening for the elastic.  This is how I did it:
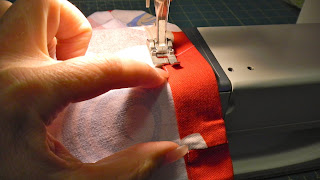

I sewed all around the front half of the skirt first.  I then started sewing the back of the skirt, leaving about an inch open at each end of the casing.

Start threading the elastic through one end.

When you have almost pulled it through....

Slide the end of the elastic up against the side seam.

And pin in place.

Then sew down over the elastic and back again to ensure it is strong.

Sew up the open part of the casing. Then thread the rest of the elastic through to the other end.

If you have the child on hand, try the skirt on!  I used the elastic measurements in the pattern for the size 9, and it turns out I had quite a bit of elastic spare!  So I pinned it to where it fitted my daughter, then trimmed off the excess elastic.

Slide the elastic up against the side seam again, making sure it's pinned in place so it doesn't slip out!
And this is what it looks like all closed up!

All in all - a really great and EASY skirt to make!  And once again, I have done something new - PLEATS!  This is a really fabulous little pattern, once you wrap your head around a few of the instructions.  As with most patterns, it's always going to be better if you have your model nearby to check the finished size.  As I discovered earlier.  The finished product looks gorgeous on, and I will definitely be making lots more!

Close up of the pleats.


The Ava Pleated Skirt!
*** I'm editing this a few days after writing it!  I have now made a size one in the pattern and got a little muddled by the sizing chart.  In the end I just took a bit of a punt of the measurements for the fabric, and made the pleats closer together (2 inches) and it worked beautifully.  


Photobucket

Read more >>

Sewing Softies - The Basics


Hello again, my name is Gemma, when I'm not busy exploring New Caledonia with my three young children I get crafty with a needle and thread.  You can read about my adventures in sewing at my blog, Pretty Bobbins.  I'm really happy to be back at The Oz Material girls and today I'm going to share some tips with you on making softies.  I must admit straight up that I'm no expert when it comes to softies, but I do love them and have made a few.  In fact I recently pulled a late nighter making 34 soft bunnies and eggs, you can read about my midnight madness here.  Or you can read my more sane post with links to some great Easter softies here :)

If you've been getting crafty for Easter you've probably seen the Twig and Thistle Bunny.  I love it!  I have made, oh, about 6 million as gifts for friends but I need to make two more (please note the terms and conditions on the Twig and Thistle site, it is for personal use only).  It is a super easy softie and a great one for beginners, so today I'm going to share some tips that will help you make great shaped softies.  Of course you can apply these to any softies and there are loads of gorgeous softie patterns over at Patterns Only

So, let's get started.

First of all you need your pattern piece.  If you are going to make your softie a few times I highly recommend making a template rather than using your printed pattern piece.  A template will give you a more consistent shape and is more durable.  Today I am using some clear template plastic, but cereal boxes also work well.


Trace your pattern shape onto your template material.


Cut out your template.  


PLEASE don't use your fabric scissors!  Save them for your pretty fabrics, you should love and cherish your fabric scissors :)  Don't put them near paper, glue, carboard, plastic, anything that's not fabric or thread really.  It is handy to have a few pairs.  I keep my scissors together in an airtight box (remember I live in the tropics and near a salty lagoon) and have a number of pairs. 


Clockwise from top Right: old fabric scissors, thread snipers,
 pliers, curved nail scissors, craft scissors, paper scissors, rotary cutter, good fabric scissors.


Now that you have a nice template to work with select and iron your fabric.  Lay your fabric right sides together and place your template on top.  Using a fabric pen trace around your template.


If you're a beginner it is going to help you to use some pins.  I may have mentioned before that I don't really like pins...

It will make life easier if you're not working with a big piece of fabric, so at this point I tend to roughly trim around my shape making sure that I cut no closer than 1/2" to my softie outline.


Before you take your fabric over to your sewing machine.  You need to consider a few things first:
  1. Where are you going to start sewing?
  2. Are there any tricky shapes that you might find easier to approach from the left instead or the right, or vise versa?
  3. What colour thread and fabric are you using?
  4. What stitch length have you set your machine to?
I find that:
  1. It is always easiest to start and finish on a straight section, in this case his bottom.
  2. Curves can be tricky when you're starting out.  You need to lift your foot or pull your fabric to make it turn with your feed dogs.  Maybe you find an inverse curve easier to manage than a converse curve.  I find this something I need to consider more on an overlocker, but it is still worth considering when using your sewing machine.
  3. I know that it can be tempting to just use whatever thread you have in your machine or to only change your top thread and leave your bobbin alone.  But trust me, your softie is going to look so much nicer if the thread is invisible.  Select a colour that blends into your fabric as much as possible.
  4. When making softies you want to reduce your stitch length down to 1.4 or 1.6  This is really important when you come to triming your seams a little later.


Your drawn outline is going to be your guide.  Personally I find it easiest to use my 1/4" foot and line the outline up with the 1/8" point which is the inner edge of the foot.  That way I'm watching my foot not my needle and I get a smoother shape.


Sew a couple of stitches back and forth to secure your ends.  You might want to reduce the speed on your machine to help you with those tricky corners.

Don't forget to leave a gap so that you can stuff your softie!  I leave about a 1" gap but you might find 1.5-2" easier for your first few goes.


Now we want to trim our seams to 1/4".


Clip any corners and cut little Vs on your curves cutting very close but not too close to your stitches.


Snip right up to your corners including the divide in your Bunny's ears.


You've probably got a sore hand from the scissors, but it's worth it!  You will get nice smooth curves from all those little snips you've made :)

Now you want to turn your Bunny right side out.  I use my fingers first.


Then I use my fabric pen with the cap on to gently push out the seams (I find that the smooth plastic cap which has a slightly rounded end is a perfect turning tool).  You can use a chopstick, rubber end of a pencil or anything that isn't sharp.  Don't use the right end of a chopstick or knitting needle as you will end up poking a hole in your seams.  If you do poke a hole in your softie, don't panic, just turn him wrong side out again and sew a little inside the section that has a hole remembering to secure your stitching.


Your rabbit skin should look something like this.


Now you want to stuff him.  Take a small amount of stuffing (I'm using the inside of a cushion, you can use toy fill).   


Push the stuffing up to the tip of his ears.  I start out using my fingers and then use the wrong end of a chopstick to get it all the way to the end.  


Keep using small amounts of stuffing and pushing them into your bunny.


You want to make sure that you are pushing the stuffing right to the edges of your softie.


It can get a little frustrating using such small pieces of stuffing at a time, but it is worth it.  If you use big pieces you will end up with a lumpy softie.  Keep going until your softie looks like this!


Recently I was given some fantastic advice on an online sewing group, The Sewing Library, in regards to stuffing softies.  Use the chicken breast test.  It should be firm like a chicken breast and like a chicken breast, it is safer to go too firm than too soft.  Isn't that great advice?  Now I know exactly how firm to make my softies!

Once you have finished stuffing your softie you need to sew him up.  Select a thread that blends with your fabric and grab yourself a needle.  


You want to use a ladder stitch so that your stitches end up invisible.  There are lots of good tutorials online but I've put together some photos to try and show you how to do it.

First sew a heap of little sitiches within your seam allowance to secure your thread.  Then bring your needle up right on the seam line right next to where your hole starts.


Take your needle over to the other side and push it in to the seam line and bring it back out about 1/8" on the seam line on the same side (see photo below).


Pull your thread tight and insert your needle back into your seam line on the other side directly opposite your last stitch.  Bring your needle out again 1/8" along on the seam line same side.


Continue until you get to the end of the hole.

Now you need to secure your stitches but you want them to be invisible.  [If I'm using a thread and material that allow me to make a few tiny stitches that can't be seen, then I will do so in addition to tying a knot.]  Bring you needle out as close to your last stitch as possible.  Now you want to tie a knot as close to the fabric as possible.  I tend to do about 3 or 4 knots on top of each other.


OK, get close to your fabric and pull your thread tight.  Can you see the hole that your thread came out of last?  You want to thread your needle back into that same hole.


Without loosing your needle inside your softie take it through your softie and bring it out.  Pull the thread firmly but not hard.  You want your knot to pop into the inside of your softie but not tear a hole in it.


Pull your thread tight and snip it nice and close to the fabric so that the thread tail disappears inside the body.

Hooray!  You shouldn't be able to see where you closed up your softie!


Now stand back and admire your work :)


You can even add a ribbon and watch your Bunnies hop around the garden.


Or put them in a basket and take them to school for your kid's friends!


You can use these tips for any softies and you will probably find that the shape of your softies improves with time :)  I hope you found this tutorial helpful!

Photobucket

Read more >>