Sunday, May 30, 2010

Step by Step Tutorial: How to Make a Melly & Me Pippi Softie

The lovely and very crafty Tracy Wyldman kindly wrote this great tutorial explaining the process of making a Melly & Me Pippi the Horse softie. Thank you so much Tracy.

Step 1: Trace your pattern pieces onto tracing paper or interfacing, being careful to match up the notches.
Step 2: Cut your main body fabric 32” x 13” and contrast fabric 32” x 3”. Sew these two pieces of fabric together. Press seams flat.
Step 3: Place the main pattern piece onto the fabric, matching up the hoof lines with the contrast fabric and cut out.

Step 4: Place the inner leg pattern piece onto the fabric matching up the hoof lines with the contrast fabric and cut out. You should have two main body pieces and two inner leg pieces.

Step 5: Cut a piece of wool felt into 8 strips measuring ¼” x 4½”. Sew these 8 pieces together at one end to form the tail.

Step 6: Cut 6 strips of wool felt each measuring ¼” x 3”. Sew these 6 pieces together at one end to form the forelock (mane that hangs down the front of the head between the ears).

Step 7: Cut your wool felt into one strip measuring 1” x 5¾”. Snip one side along the length approximately every ¼” to form the mane, but only snip in about ¾”, leave a ¼” so the can be attached to the main body.

Step 8: Referring to your pattern pieces, take one piece of the main body and tack into position the tail, fringe and mane.

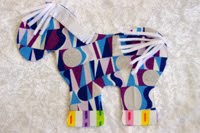
Step 9: With right sides together match up one main body part and one inner leg part and sew together. Do this to the other side also.

Step 10: Now sew the two pieces together to make the whole thing, leaving an opening at the saddle area for the stuffing.Step 11: Turn right side out.
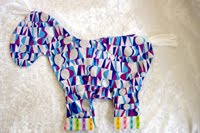
Step 12: Stuff the pony with toy stuffing making sure you get the stuffing into the corners and all parts. Use plenty of stuffing. Hand sew the opening together with strong thread.Step 13: Cut a piece of contrast fabric 4” x 13”, place the right sides together and fold. Cut a piece of iron on pellon 4” x 6½”, iron the pellon to the wrong side of the fabric. Trace the pattern to the wrong side of the fabric and sew around this line, remembering to leave a gap for turning. Trim leaving a 1/4'” seam. Turn right way out and topstitch around the edge.
Step 14: Tack into place using a slipstitch.Step 15: Using the contrast fabric, fold right sides together and trace the ears pattern onto the wrong side of the fabric, do this twice. Sew around the drawn line remembering to leave a gap for turning. Cut the ear shapes out leave about a ¼” seam allowance. Turn the right way out.
Step 16: Using a strong thread, stitch along the bottom edge of the ear and pull up thread to gather.Step 17: Stitch into place on the pony’s head using the pattern as a placement guide.Step 18: Sew on the eyes either with stitching, buttons or gems.
The Melly and Me Pippi is available as a complete pattern and fabric kit or as a pattern only.

Photobucket

Saturday, May 29, 2010

Celebrate With Us


We are celebrating a recent benchmark and want to party with our lovely fans and customers, so for starters we are offering you all 10% off everything at TheOzMaterialGirls - just enter code FB10% at checkout . Plus just add Celebration to the comments at checkout and you will receive a FREE gift with your order. Sale is on for 2 days only, while stocks last


We are also going to have a few games along the way where you can win some great prizes- We will be giving out clues until the first person leaves a comment below with the correct answer. So keep checking back here to see what the next game is


How to Play:


1. Answers can be found on our website - The Oz Material Girls - and from the clues /questions given search products that may relate


2. Come back here and leave a comment below with the Question Number and either the title of the listing which relates to your answer or the answer to the question given , plus a copy of the url address(just copy and paste)


3. First to comment correctly will win that prize , delivered FREE to you

4. You can only win 1 prize so everyone gets a chance :)


5. If you are a winner, please email your details to thematerialgirls@ozemail.com.au. We will list all the winners below


Good Luck Everyone and thanks for all your lovely support along the way and for celebrating with us


Question 1 - Who designs and makes the gorgeous new range of fabrics called Summer Song ( up for grabs is 1 x 8pc stash builder in one of the ranges)

QUESTION 2 :

We have hidden the Celebrate With Us logo in 1 of our listings, work out the clue and leave a comment below with the title of the item

- Here is the clue - Oh Come With Us & Gallop


QUESTION 3 - First 4 people to keave OWL Fabric and what the background colour of the gorgeous owl fabric by Alice Kennedy is will win a f/q


QUESTION 4:

What is the completed size of the fabulous new handbag design Bella by Melly and Me?

QUESTION 5:

What craft organiser do you use to store all your f/qs in


QUESTION 6: What are the names of the 5 adorable baby animals that feature in the Jungle Babies Panel

QUESTION 7:

7. What is the name of our sister shop and what is the URL address ( correct answer will win a pattern of their choice up to the value of $17.50

QUESTION 8

8.What 2 languages can you learn on the educational teaching panel

QUESTION 9:

Curbys Baby Shoes are "Too cute to...........

First 3 fans to correctly finish the slogan will win 1 of these adorable patterns


QUESTION 10:

How big are the bird motives on the Birds on Leaves fabric by Saffron Craig

Riley Blake's Summer Song

For those in the Northern Hemisphere, the sights, sounds and smells of summer are beginning to greet you each morning. For us, in the Southern Hemisphere, we dream of summer days past as the coolness of winter sets in.

No matter if you are North or South, Riley Blake's Summer Song collection by My Mind's Eye offers something for everyone.
I can imagine throwing the quilt pictured above onto the grass in the warm sun, enjoying the sunshine with a bub or toddler close by.

Or curling up by the window, in a spot of winter sunshine, the quilt over my knees and a hot cup of tea in one hand and a good book in the other.

Riley Blake's Summer Song fabrics are now in store at The Oz Material Girls. Available in three colourways - orange, green or yellow.

What are your summer time dreams?

Photobucket

Wednesday, May 26, 2010

Giving Handmade: Baby Showers, Babies, Toddlers

There is nothing quite like receiving a handmade gift. Knowing you are the recipient of not only a thoughtful gift but also the giver's time, focus and handiwork. Any one of the Funky Friends softies would make a perfect handmade gift for a baby shower, newborn or toddler, and there are plenty of soft and cuddly friends to choose from...

Farmyard Friends like Lamkins and Dilby,

Jungle Juniors like Ellie and Mitch,

Fairytale favourites like Prince Charming and Unix.

Photobucket

Monday, May 24, 2010

Making Perfectly Shaped Hats: Featuring Toni of Make It Perfect Patterns

When Louise asked me if I would be interested in writing a guest post for the Oz Material Girls blog I thought it would be a good time to share a few tips to help you make perfectly shaped hats.

From time to time I get emails from people sewing either my Lazy Day Hat or About A Boy cap patterns who are having trouble attaching the band to the crown of the hat without getting puckers in the band. This is REALLY easy to do. I’m a big fan of shortcuts in sewing, but this is one of those times when you can’t afford to take any shortcuts and need to be very particular with following the instructions.

First of all, get your crown and band pieces ready. Mine have stiffener basted to the wrong side already (I used a light blue thread to baste).

The next thing you need to do is take both your crown and band pieces and fold them into quarters and mark the quarter points with pins.
Take your band piece and making sure that you are working at the TOP edge of the band, cut small snips (no more than 1/2'” long) around the top edge of the band. The more snips you cut, the easier it will be to join the band to the crown. I usually leave about ½” between my snips. Don’t worry if you cut through your basting stitch.
With the right sides together, place the top, snipped edge of your band and outside edge of your crown together. Match up pins at each quarter mark so that your band is distributed evenly around the crown.
This next step is one you can’t afford to skip…pin the remainder of the band and crown edges together using LOTS and LOTS of pins. The more the merrier here…it will make a huge difference to your finished hat. When you are pinning, you may need to gently stretch either the band or the crown a little to make sure that there is no excess fabric when you reach each quarter mark pin.
Sew slowly around the pinned edge, once again making sure that you are careful there is no excess fabric when you reach each pin.
And that’s it! Here is the pucker-free band from the outside.
And a picture of the finished cap (yes, About A Boy is girl-friendly!!!)
I hope that you find this tutorial helpful…I love questions and feedback so feel free to ask away!

Thank you so much Toni for sharing your wisdom and experience with us. Why not check out the range of Make It Perfect patterns in store at Patterns Only? You will find an adorable range of clothes and accessories suitable for children of all ages and versatile clothing pieces for adults.

For your chance to win either the Lazy Day hat Pattern of About a Boy, just leave a comment below and tell us which one you would love to make and why ( you need to be following our blog to win)
The Winner is Leah (mummy made it) - Congratulations

Photobucket

Friday, May 21, 2010

Sew Liberated: Traditional Crafting with a Modern Twist

The Sew Liberated pattern range is the brainchild of Meg, a designer, author, Montessori teacher, and - most importantly – Mama from the United States, who started sharing her patterns as a way of supplementing her meager income as a teacher working in Mexico. In describing her mix of traditional craft and modern design, she says;

"Sew Liberated is a name that I chose because of its many layers of meaning and many possibilities of interpretation. For me, Sew Liberated is a way of looking at craft that is, at once, traditional and completely modern. Depending on who you are and your own preferences, you can find solace in the "traditional crafts" either as a return to a slower lifestyle, or as a fist-held-high statement of non-conformism with today's commercial culture. Personally? I identify with both reasons and don't see them as mutually exclusive. In addition, Sew Liberated touches on the personal fulfillment we experience when we create. "

– From the Sew Liberated website

The range of Sew Liberated patterns includes stylish, modern designs for Mums and children, and a range of handy accessories, complete with easy-to-follow photo tutorial instructions, assembly diagrams and full-sized pattern pieces. Now for a sample of the range…

The Flora Tunic and Twirly Skirt will make the little girl in your life dizzy with glee! The Tunic features a comfortable, A-line cut with an eye-catching pleat just below the neckline. The Twirly Skirt is, perhaps, the twirliest of all - the weight of the fabric and the faux skirt layers give it such a satisfying spin!

The Emmeline Apron (pictured at top) is the one you’ve been waiting for - modern, stylish, and fun to sew. You’ll never want to take it off! Best of all, Emmeline is completely reversible, so it’s like two aprons in one.

Stylish, flattering, and quick to sew, the Schoolhouse Tunic is a versatile addition to your wardrobe. Make the tunic-length to wear as a dress or over jeans - or make a shirt-length version.

Whatever your treasures, the Mischievous Gnome Messenger Bag is your trove. Featuring a large rear pocket for magazines and books, two front pockets for easy access, and a generously-sized zipper pocket on the inside, this bag will quickly become your most trusted companion.

You can now find Sew Liberated patterns in store at Patterns Only.

Photobucket

Wednesday, May 12, 2010

Tutorial: Bias Basket Handles from Baskets in Bloom

This tutorial by Gail of Gail Pan Designs will help you form bias basket handles as featured in her book of designs, “Baskets in Bloom.”

Step 1: You will need a ¼” bias maker, 5mm fusible tape, some pins, template plastic and your iron. Choose a background fabric and a fabric for the basket.

Step 2: Trace around the inside of the basket handle onto template plastic. Cut out the shape on the line. Put aside for now.

Step 3: Cut a handle strip following the instructions, trimming a point at one end.

Step 4: Insert the fabric strip into the bias maker, using a pin to push it out of the tip. Then insert the fusible tape on the top side of the bias maker, make sure the fusible side is facing down onto the fabric.

Step 5: Use your iron to press the fabric strip and the fusible tape together, pulling slightly on the tape maker to draw the fabric through.

Step 6: You will end up with a bias strip ¼” wide with fusible tape on the wrong side. Peel the tape off carefully.

Step 7: Use your ruler to guide in placing the basket handle in the middle of the background fabric. Place a pin in the middle (I am doing this on the ironing board so the pins will hold the handle in place).

Step 8: Place the template under the handle and pin the handle around the template.

Step 9: Press gently and carefully with your iron, removing the pins as you go. Once the handle is fused to the background fabric, you can stitch in place. Place the basket body in place and applique.

Step 10: Finished!!

Visit Patterns Only to see our range of great Gail Pan Designs in store.


Photobucket